Using IntelyCare Staffing
This user guide covers the most frequent tasks that IntelyCare Staffing facility users perform on a day-to-day basis. To get the most out of this content, have your Staffing Hub open while you work.
Contents
- Where do I login?
- Where do I download the facility app?
- How do I run a PBJ report?
- How do I request an IntelyPro for a single shift?
- How do I request an IntelyPro for multiple shifts?
- How do I request multiple IntelyPros for a single shift ?
- How do I request multiple IntelyPros for multiple shifts?
- How do I boost when creating one or more IntelyPro requested shifts?
- How do I boost a single IntelyPro requested shift?
- How do I boost multiple IntelyPro requested shifts?
- How do I boost all IntelyPro requested shifts?
- How do I change overtime settings at my facility?
- How do I apply overtime to one or more shifts?
- How do I modify boost and overtime settings for requested shifts?
- How do I setup notifications?
- How do I view all documents related to each IntelyPro who has accepted a shift at my facility?
- How do I book a specific IntelyPro for one or more shifts (Book Me)?
- How do I rate an IntelyPro who has worked at my facility?
- How do I DNR an IntelyPro?
- How do I cancel a specific IntelyPro who has accepted a shift at my facility, but keep the open shift request for another IntelyPro to pick up?
- How do I cancel an IntelyPro who has accepted a shift and delete the request for another IntelyPro for that shift?
- How do I delete a pending IntelyPro request that no one has accepted yet?
- How do I view billing related items?
- How do I see the IntelyPro status on a shift (accepted, on way, checked in)?
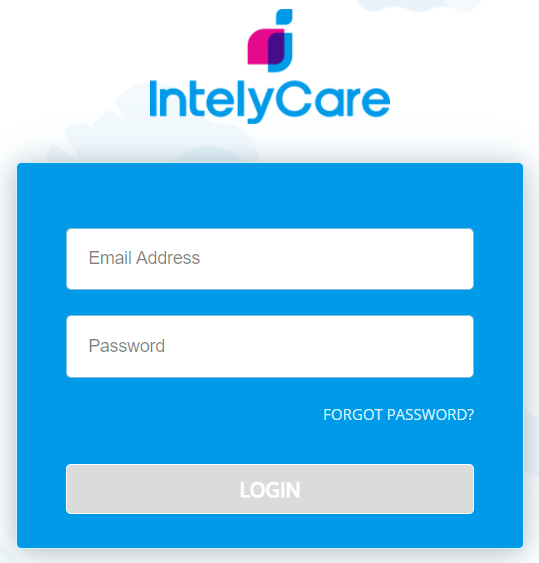
Where do I login?
- Navigate to the Login page:
https://app.intelycare.com/facility/login - Enter your Email Address and Password
- Click the Login button
NOTE
If you forget your password, click the FORGOT PASSWORD? link and follow the instructions to reset your password.
Where do I download the facility app?


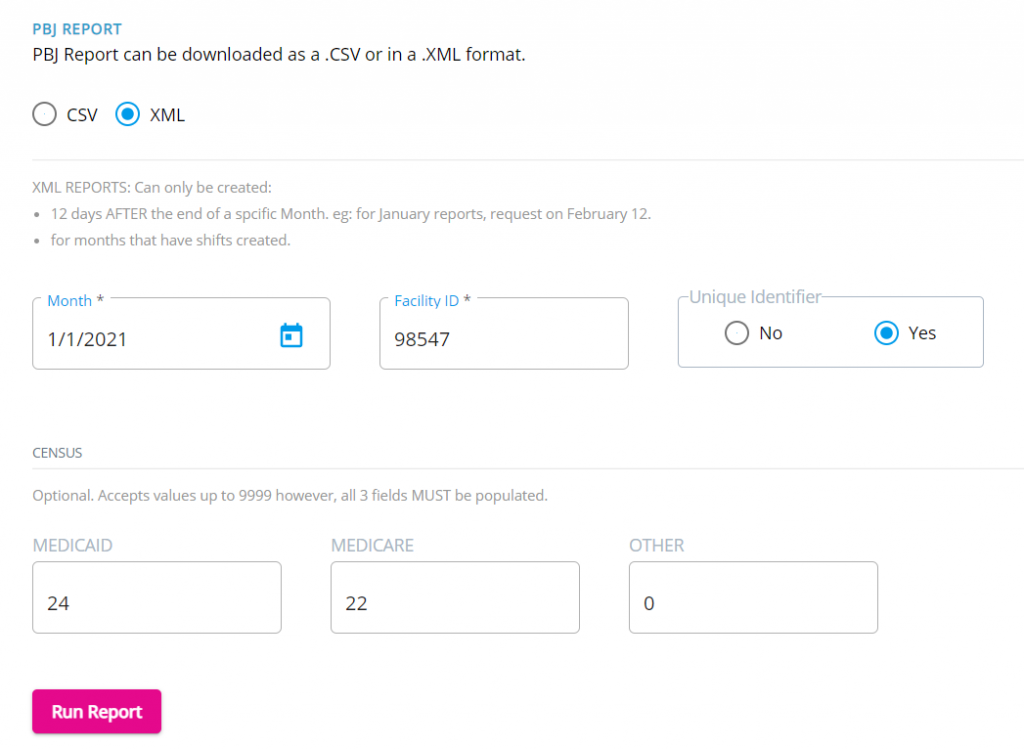
How do I run a PBJ report?
- Click SCHEDULE in the top navigation
- Click IntelyCare Staffing in the secondary navigation
- Scroll down to PBJ Report
- Choose CSV or XML
- Fill in the information to pull the report (month needed, etc.)
- Click the Run Report button
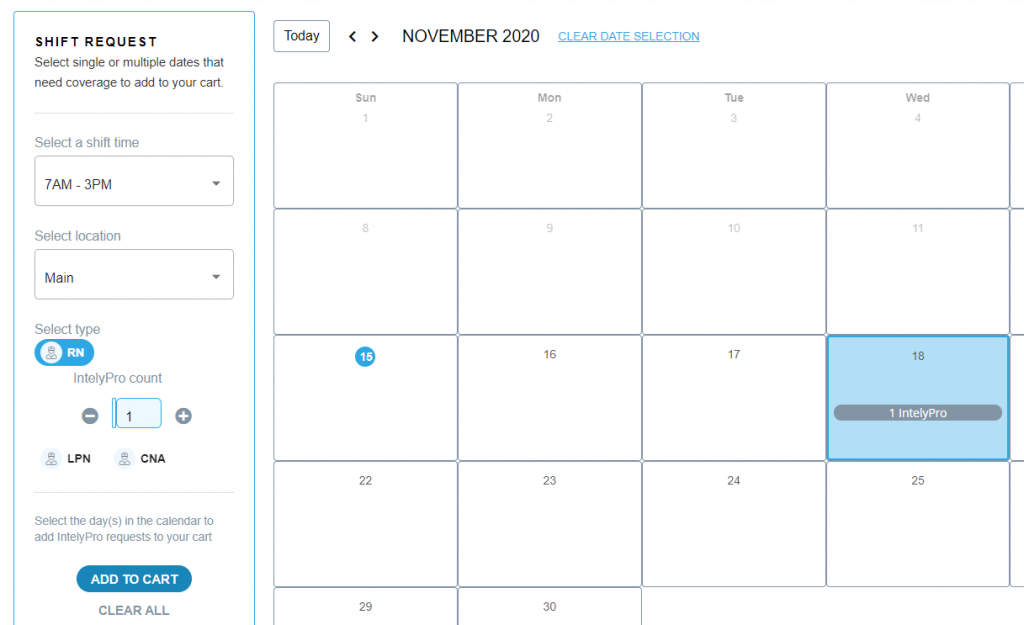
How do I request an IntelyPro for a single shift?

- Click DASHBOARD in the top navigation
- Click the REQUEST INTELYPRO button
- In the SHIFT REQUEST popup, choose your shift options: Shift Time, Location (Floor), and Type (RN, LPN…)
- Click on the day you would like the shift to fall on (November 18th shown here)
- Click the ADD TO CART button
- In the upper right of the screen, click the VIEW CART button
- In the cart, click the SUBMIT REQUESTS button
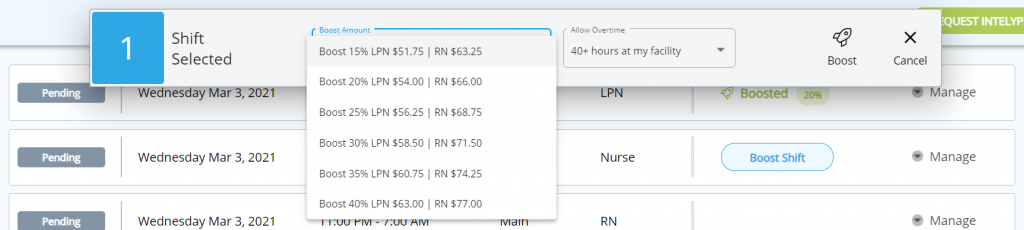
How do I boost when creating one or more IntelyPro requestedHow do I boost a single IntelyPro requested shift?
- Click DASHBOARD in the top navigation
- Scroll down to locate the pending shift you’d like to boost
- Click the Boost Shift button:

4. Select the Boost Amount in the popup, then click Boost:
How do I boost when creating one or more IntelyPro requestedHow do I boost a single IntelyPro requested shift?
- Click DASHBOARD in the top navigation
- Scroll down to locate the pending shift you’d like to boost
- Click the Boost Shift button:
4. Select the Boost Amount in the popup, then click Boost:
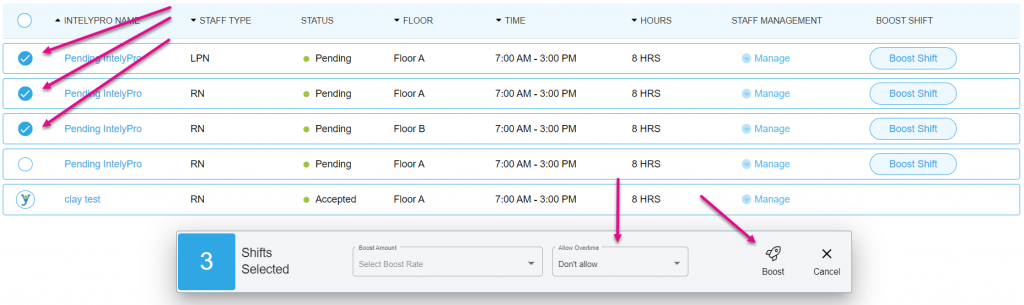
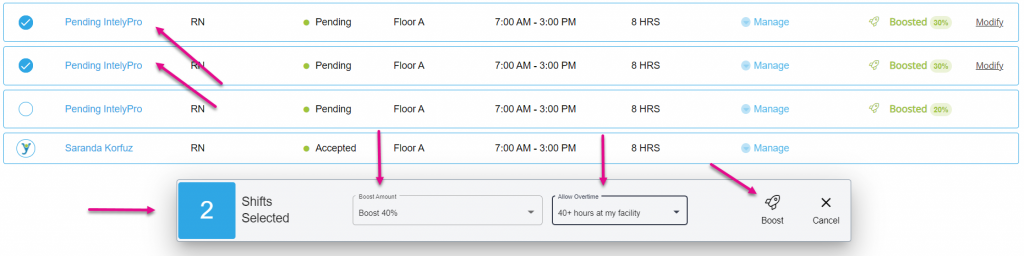
How do I boost multiple IntelyPro requested shifts?
- Click DASHBOARD in the top navigation
- Scroll down to locate the first pending shift you’d like to boost
- Click the Boost Shift button:

- Select more shifts by clicking to the left of the shift (the popup will increment the number of shifts selected)
- Select the Boost Amount in the popup, then click Boost:

How do I boost all IntelyPro requested shifts?
- Click SCHEDULE in the top navigation
- Click the BOOST ALL PENDING REQUESTS button:

- The Boost Popup will show how many shifts will be impacted (126 in this example)
- Select the Boost Amount, then click Boost

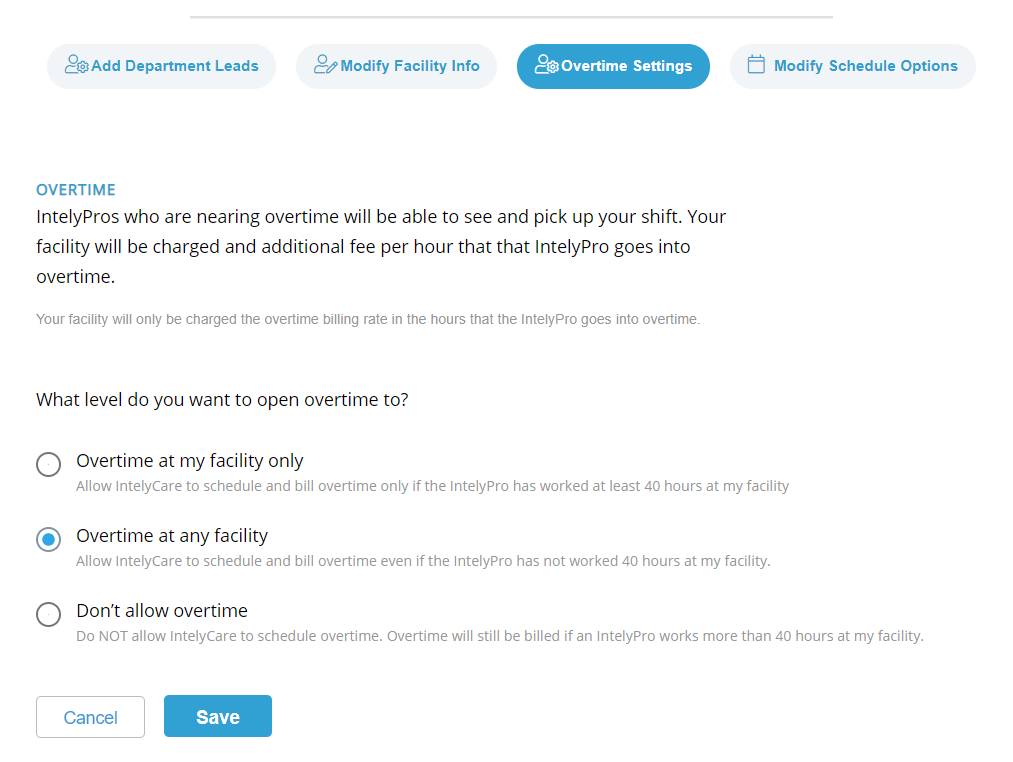
How do I change overtime settings at my facility?
This functionality increases the amount of IntelyPros that can see open shifts at your facility and helps you fill those open shifts. Overtime is the ability to offer Overtime to IntelyPros in the IntelyCare client app. Without overtime, IntelyPros cannot sign up for shifts that would put their weekly hours over the 40-hour threshold.
- Click SETTINGS in the top navigation
- Click Overtime Settings in the secondary navigation
- Select the Overtime option you would like for your facility
- Click the Save button
How do I apply overtime to one or more shifts?
- Click SCHEDULE in the top navigation
- Locate and click on the day the shifts fall on – you’ll see a list of shifts for that day underneath the calendar
- Select one of the shifts you’d like to change Overtime Settings for and click the Boost Shift button:

- Select more shifts by clicking to the left of the shift (the popup will increment the number of shifts selected)
- Select the setting from Allow Overtime in the popup, then click Boost:
How do I modify boost and overtime settings for requested shifts?
- Click SCHEDULE in the top navigation
- Locate and click on the day the shifts fall on – you’ll see a list of shifts for that day underneath the calendar
- Hover over one of the shifts you would like to update and click Modify:

- If desired, select more shifts by clicking to the left of the shift (the popup will increment the number of shifts selected)
- Select the Boost Amount and Allow Overtime settings in the popup, then click Boost:
NOTE: Once a shift has been boosted, you can modify the boost settings (as shown above), but you cannot completely remove the boost. To remove the boost, delete the shift request and re-enter the shift.
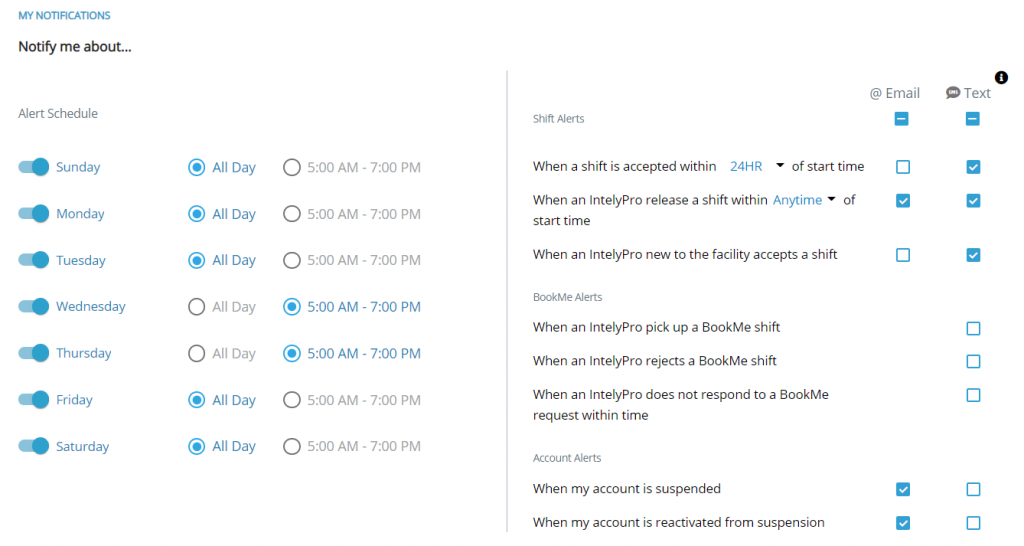
How do I setup notifications?
- Click SETTINGS in the top navigation
- Click Manage Profile
- Scroll down to My Notifications
- Update your notifications
- Click the Save button

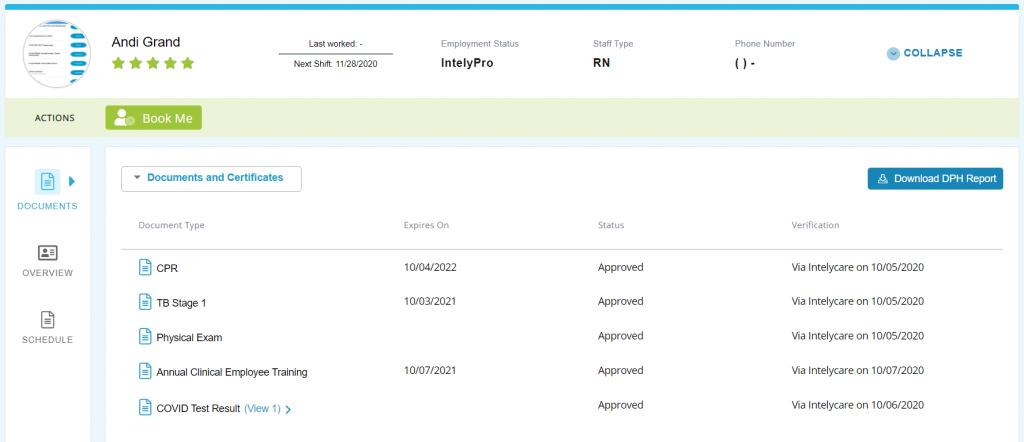
How do I view all documents related to each IntelyPro who has accepted a shift at my facility?

- Click DIRECTORY in the top navigation
- Find the staff member in the directory (search or scroll)
- Click the EXPAND radio button (on the right)
- In the left column, click the Documents icon
- In the dropdown, select Documents and Certificates
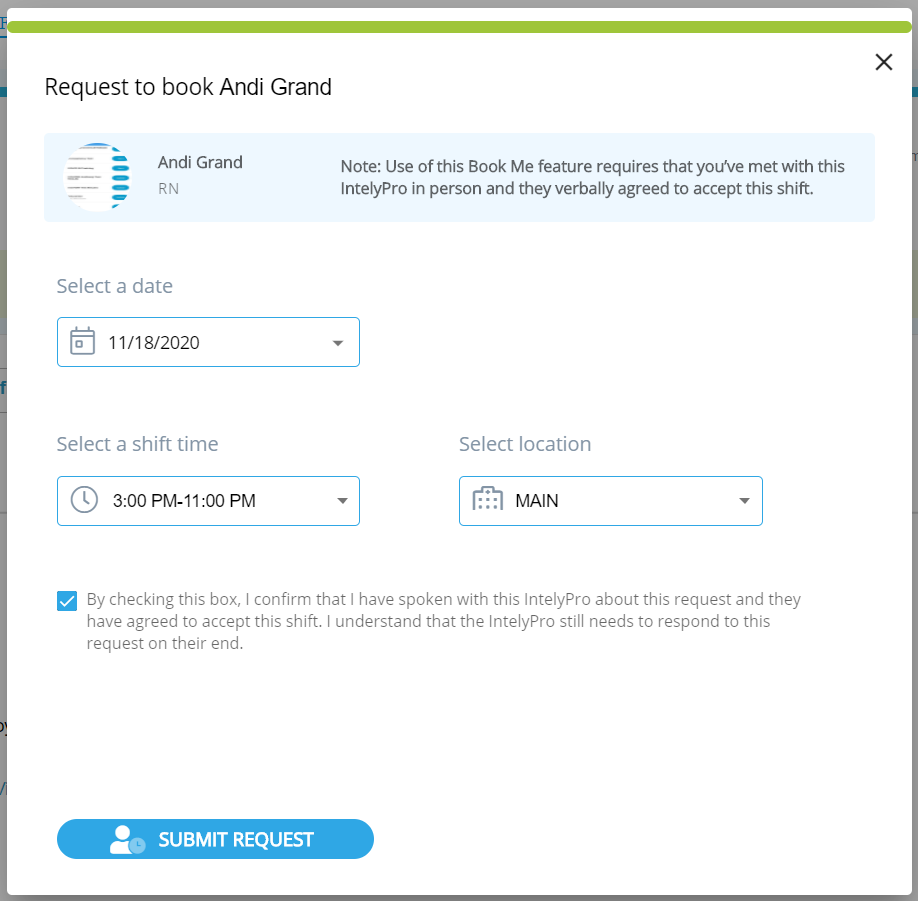
How do I book a specific IntelyPro for one or more shifts (Book Me)?

- Click DIRECTORY in the top navigation
- Find the staff member in the directory (search or scroll)
- Click the EXPAND radio button (on the right)
- Click the BOOK ME icon
- In the Book Me popup, select a date, shift time, and location
- Check the Confirmation checkbox to activate the button
- Click the SUBMIT REQUEST button
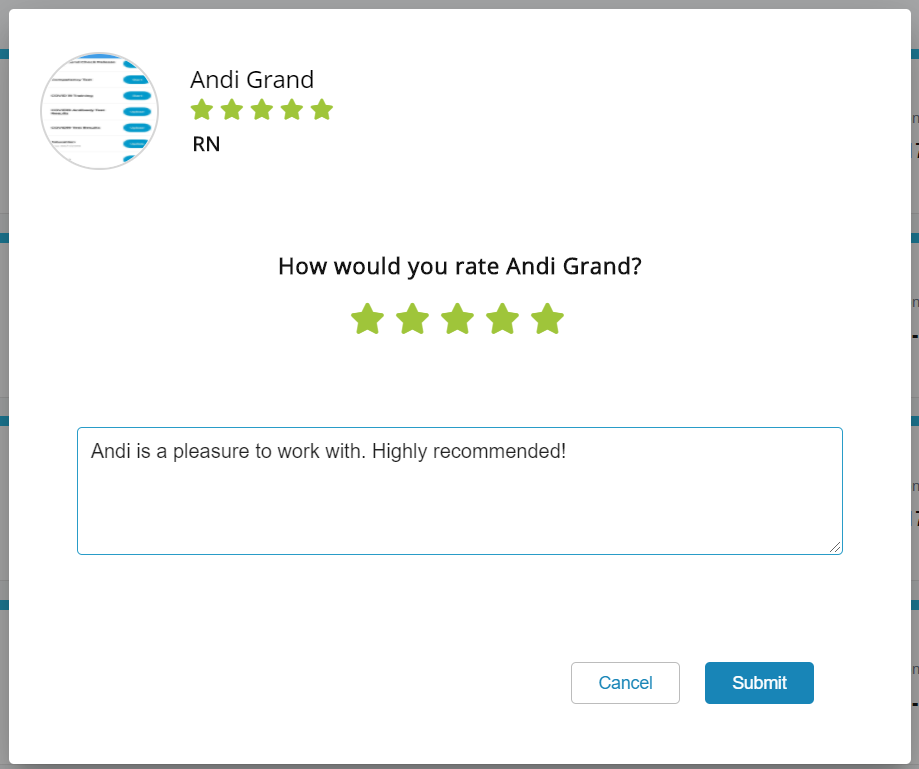
How do I rate an IntelyPro who has worked at my facility?

- Click DIRECTORY in the top navigation
- Find the staff member in the directory (search or scroll)
- Click anywhere on the stars under their name
- In the popup, click on a star rating (5 = best; 1 = worst) and enter a review in the text box
- Click the Submit button
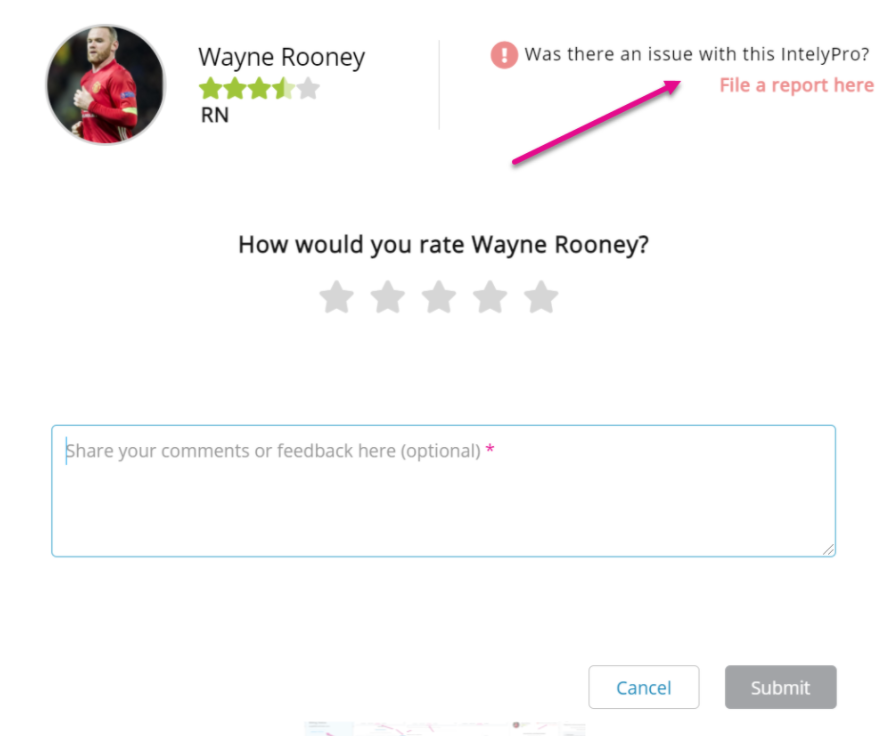
How do I DNR an IntelyPro?
- Click DIRECTORY in the top navigation
- Find the staff member in the directory (search or scroll)
- Click anywhere on the stars under their name
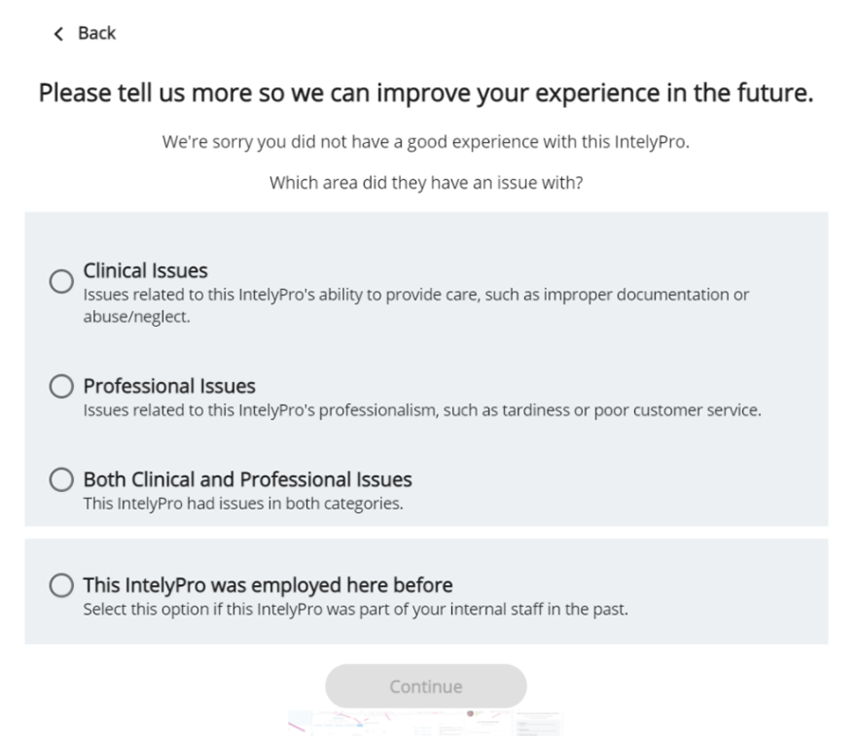
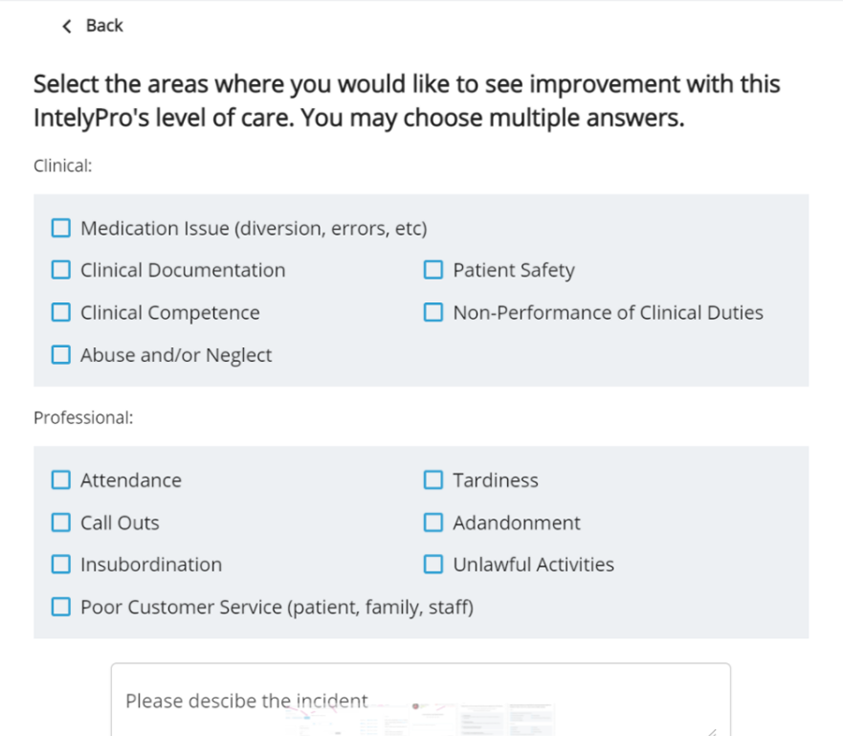
- In the popup, click on the File a report here link
- Follow the prompts to enter a detailed report
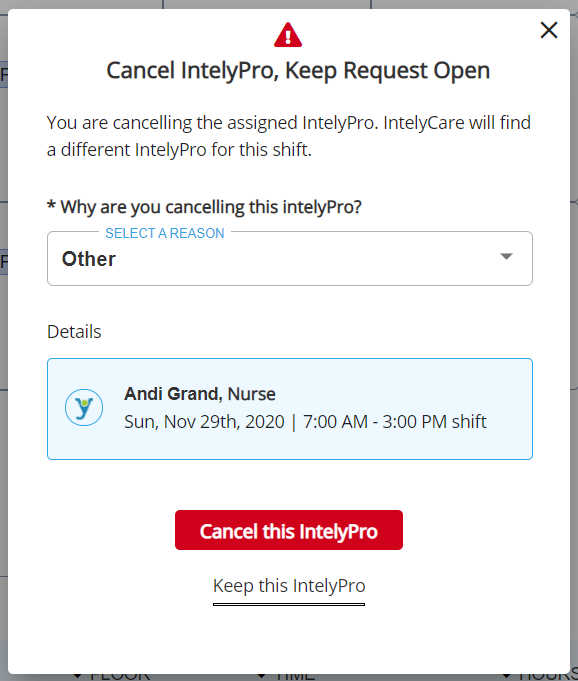
How do I cancel a specific IntelyPro who has accepted a shift at my facility, but keep the open shift request for another IntelyPro to pick up?
- Click SCHEDULE in the top navigation
- Locate and click on the day the shift falls on – you’ll see a list of shifts for that day underneath the calendar
- Find the shift you’d like to cancel

- Click Manage button
- Select Remove IntelyPro from Shift
- In the popup, choose a reason from the select a reason dropdown
- Click the Cancel this IntelyPro button
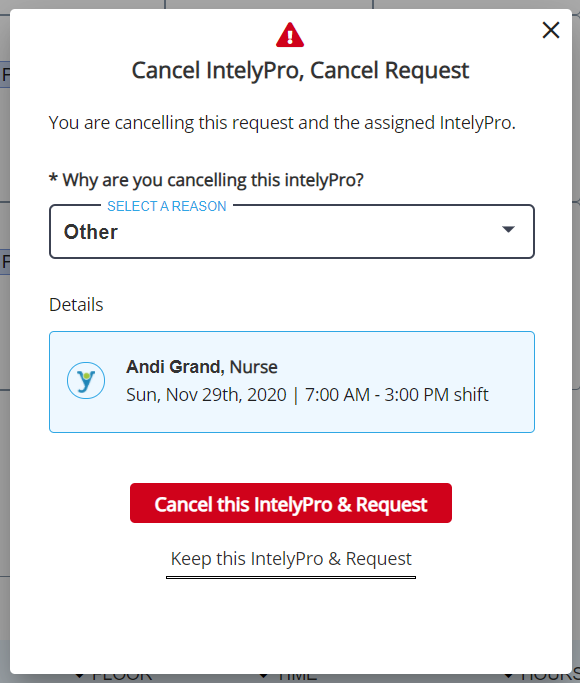
How do I cancel an IntelyPro who has accepted a shift and delete the request for another IntelyPro for that shift?
- Click SCHEDULE in the top navigation
- Locate and click on the day the shift falls on – you’ll see a list of shifts for that day underneath the calendar
- Find the shift you’d like to cancel

- Click the Manage button
- Select Remove Shift & IntelyPro
- In the popup, choose a reason from the select a reason dropdown
- Click the Cancel this IntelyPro & Request button
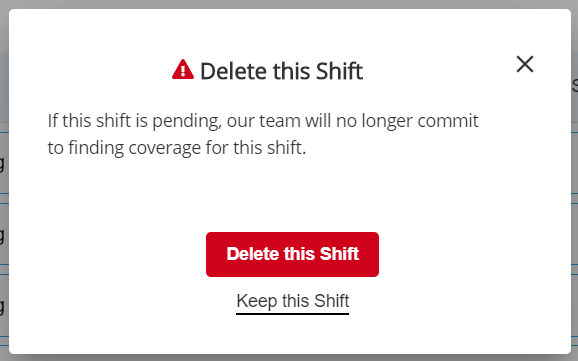
How do I delete a pending IntelyPro request that no one has accepted yet?
- Click SCHEDULE in the top navigation
- Locate and click on the day the shift falls on – you’ll see a list of shifts for that day underneath the calendar
- Find the shift you’d like to delete

- Click Manage button
- Select Delete Shift
- In the popup, click the Delete this Shift button
How do I view billing related items?
- Click on your initials in the top right corner of the screen
- Billing info is shown in the dropdown
NOTE: You will only see a billing status if you have permission to view them.

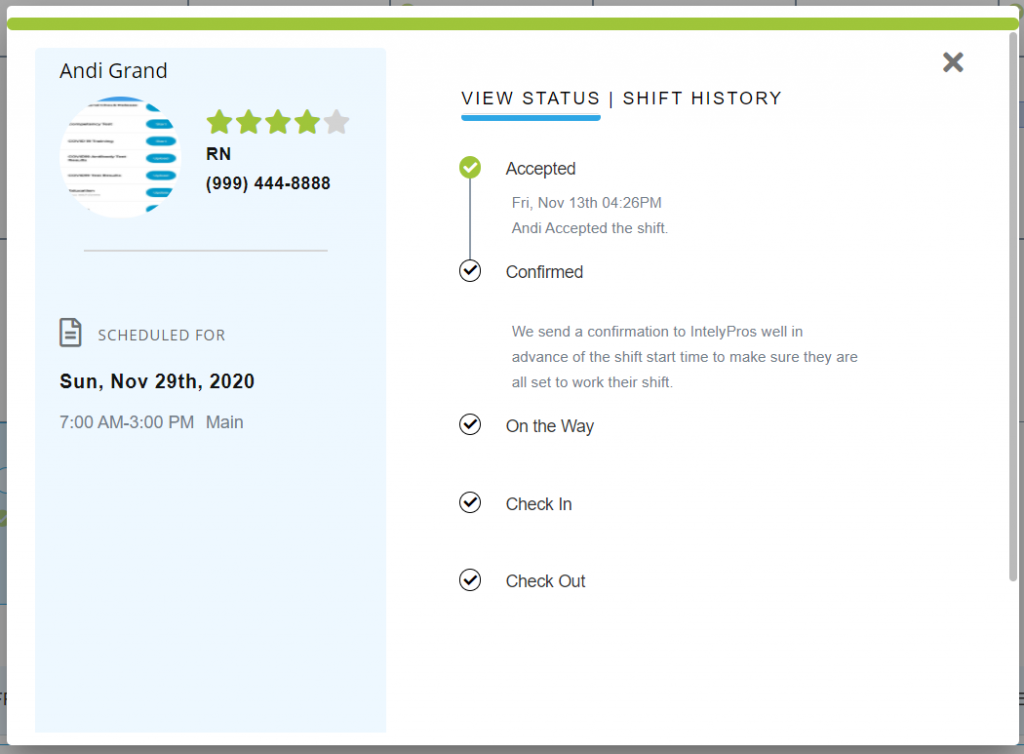
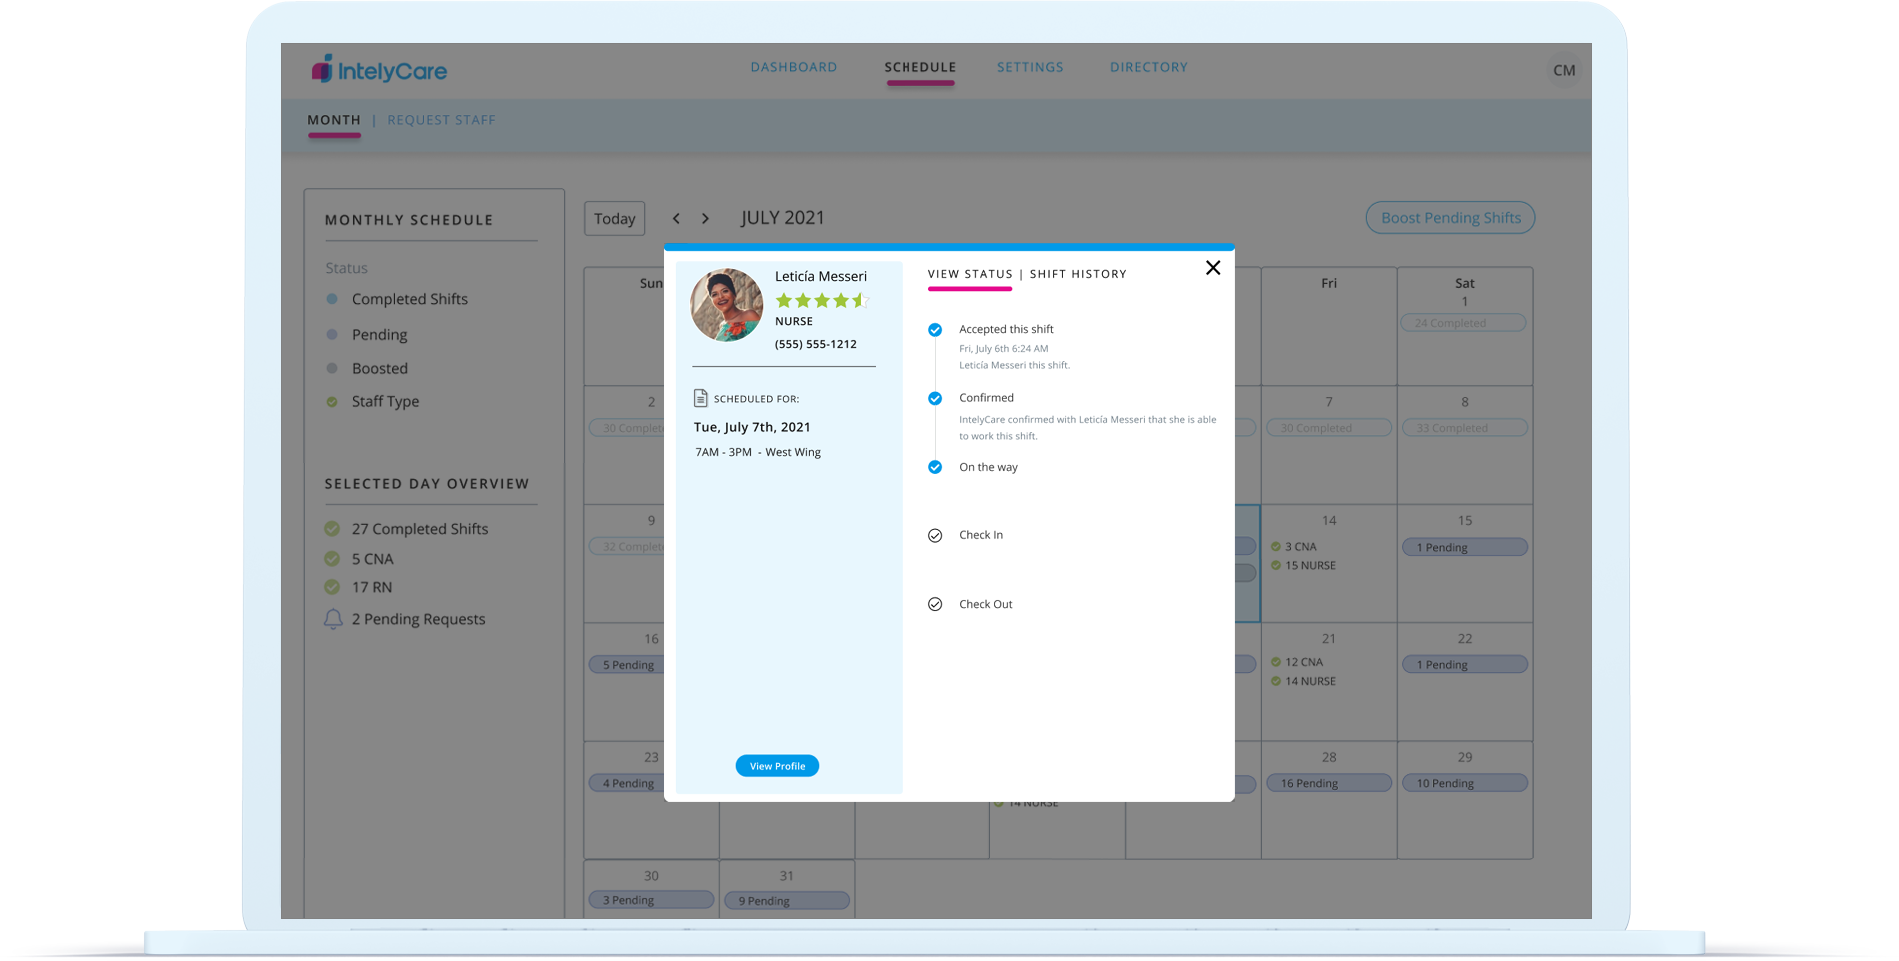
How do I see the IntelyPro status on a shift (accepted, on way, checked in)?
- Click SCHEDULE in the top navigation
- Locate and click on the day the shift falls on – you’ll see a list of shifts for that day underneath the calendar
- Find the shift you’d like to check

- Click the IntelyPro’s name
- Status is shown in the popup